I would say that among the top three questions we get asked as gel nail specialists are, “What curing unit do you recommend?“.
And I get it. There are numerous options, especially if you would do a simple online search or even jump on a site like Amazon.
More often than not, you’ll probably make your purchasing decision on price… Am I right?
Today I want to equip you with all the information you should consider before buying the most crucial player in the success of your gel nail applications. A curing lamp.
Let’s get started.
When purchasing a curing unit, there are five key factors to consider: Power, wattage, intensity, curing times, lamp design, and a few other details we’ll also be discussing today.
What type of nail lamps are out there for gel nails?
We should first distinguish the two main types of nail lamps available. While you will mostly find LED lamps on the market, there are still CFL (Compact fluorescent lamps) in production. However, they both use the same UV light to cure all gel products. The main advantage of LED nail lamps is that the bulbs have a focused wavelength that cuts down on curing time.
For example, where a CFL lamp would need 2 minutes for a coat of color gel, an LED lamp would only require 30 seconds. (And 2 minutes was considered a fast once, whereas now we are spoiled thanks to the introduction of LED lamps!)
How do gels cure?
To understand why choosing a suitable curing unit is essential, let’s have a quick lesson on how gels cure.

UV gels are created with photoinitiators, and this ingredient is the catalyst in curing (called polymerization). However, it’s not as simple as that. A chemist does not use the same type of photoinitiators in every formulation. Each range of gels uses different combinations of photoinitiators at different concentrations, which cure at different wavelengths… And well, that’s a lot of differences!
This complicated polymerization process transforms your liquid or cream gel into its solid state. So, it sounds like you need the curing unit that matches what your chosen gels were formulated to cure.
This is the most accurate way to select your curing unit to avoid issues. I recently created a video on this topic, which you can check out in our library.
What does “properly cure” even mean?
An introductory note to remember is that there are

Think of Goldilocks, finding that “just right” fit. Your Japanese gels must be cured “just right” to achieve their adequate cure.
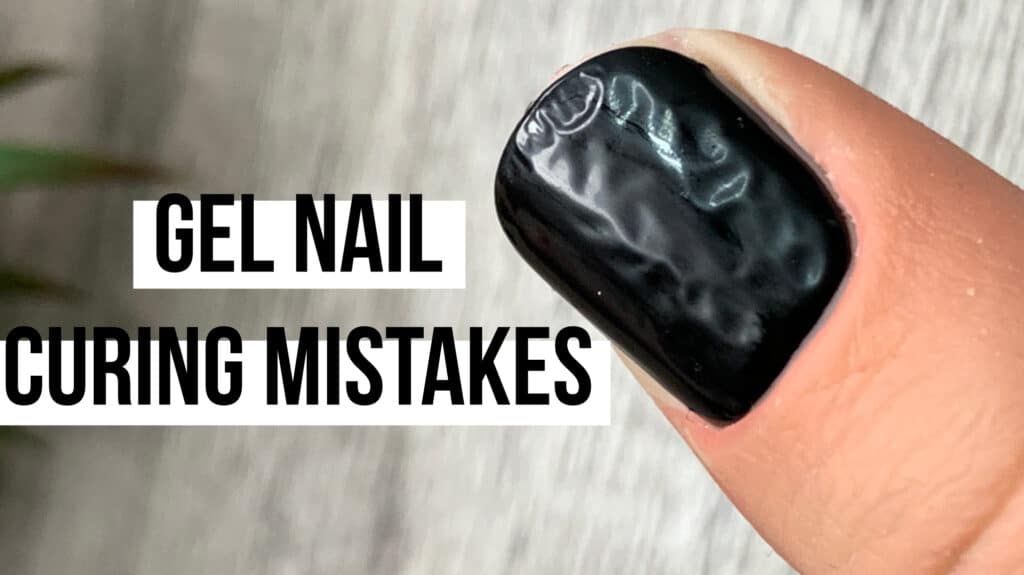
You may wonder, what’s the big deal? Still, anything other than this proper cure could result in service breakdown. Gel chipping, wrinkling, etc., and an increase in potential skin reactions like irritation could lead to an allergy to acrylates.
An allergy is for life! Have you ever visited a health service, and they ask you if you’re allergic to anything? Suppose you develop an allergy to gels. In that case, you’ll have to list them in that circumstance, which affects what medical options are available to you. So things can get dire if you become allergic to products.
Since most of these allergies are caused by improperly cured gels, invest in the best curing unit for our choice of Japanese gels to avoid the risk of developing one. Thankfully, most Japanese gels are hypoallergenic, significantly decreasing the risk of skin irritations.
Hypoallergenic…
I want you to understand this word, hypoallergenic. It means less allergenic. Even so, especially when soaking off or filing without a dust collector, unreacted monomers are free to roam on your skin!
Surprisingly, an over-cure does not always mean that the gel has become too cured (we want it as fully cured as possible). Still, it can also mean the product was cured too quickly.
This is manifested when experiencing a very intense heat spike when exposed to the UV in your unit. Not only could this damage your nail bed beneath the nail plate, but it also may result in a brittle nail coating that will likely chip and lift. Just another reason why reaching that coveted perfect cure is critical.
We are dealing with chemicals, and using the right equipment for them is essential.
What factors yield a “proper cure”?
The secret recipe to a proper cure is; Wavelength, Intensity, Timing, and Lamp Design.
Thankfully, most reputable UV gel manufacturers, who follow strict guidelines, have created the perfect lamps for their specific formulations that achieve an ideal cure. This is especially true of Japanese gels because the market is so competitive.
This drives their products’ quality so much that inferior gel brands simply don’t survive under such scrutiny.
And so… Here’s the short answer;
Choose the lamp that your gel brand manufacturer recommends.
You may ask, “Why won’t any lamp do? My gels feel hard when I cure them in the lamp I got off Amazon/AliExpress/Wish, so what’s the big deal?”
Understandably many are satisfied when the UV products harden. We incorrectly assume solidifying means adequately cured, but that isn’t true.

To get the best out of gels and avoid causing skin sensitivities, these coatings should be cured to around 90%.
Let’s break down the secret recipe to correctly curing gels…

First up, a misconception to dispel.
1. Wattage
Wattage is incorrectly believed to be the UV strength of the lamp; however, wattage is the amount of power needed to operate the CFL or LED bulbs. Therefore wattage is not a measurement of UV output. Wattage is actually “power consumption” and not “UV output.”
Different nail lamps with identical wattage will likely cure the same gel product to different degrees, which may result in under-curing.
2. Intensity
Wavelength intensity. UVA “intensity” is crucial to proper curing.
Intensity determines how much UVA is available for curing. LED style nail lamps have higher intensities of UVA wavelengths which are the most important for curing.

Depending on your use if you’re a full-time nail technician, it will be a yearly expense, even with high-quality Japanese nail curing lamps. The bulbs cannot provide the same intensity with extensive use, and it’s not something you will be able to see with your eyes. Still, it’s essential to trust the years of research behind this information. So remember: the wattage of a bulb will stay the same, but UVA light “intensity” will slowly degrade every time a UVA bulb is turned on.
3. Curing Times
We are usually first made aware of timing when experimenting with gels. Thirty seconds, 60, 90…it all depends on what you are using. Every manufacturer has implemented unique specifications in their gel products, so every brand can have very different timing requirements. However, this is just one element in achieving a proper cure. It still needs all the other factors prescribed, like the timing of the bulbs must be at the correct wavelength.
4. Lamp Design
We don’t usually think about the electronics inside the lamp. However, the electronic components are what drive the bulbs to produce UV. These components govern UV intensity, so different lamps will have various parts. So if the same bulbs are used in two other brands of lamps,
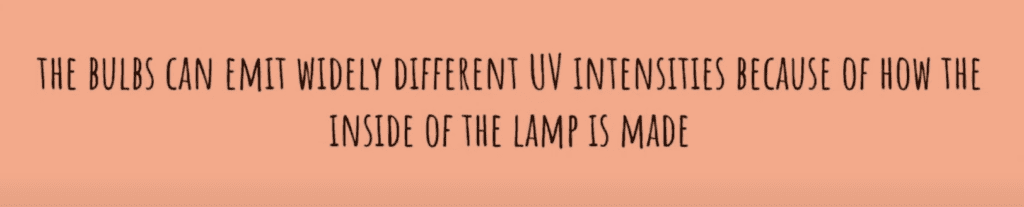
The positioning of the bulbs and even the type of interior reflection material (or lack of) used are critical factors that determine complete curing. The distance between the nail plate and the bulbs dramatically affects the intensity available to the nail coating.
Even small changes in this distance can have enormous consequences on that proper cure.
Nail lamp design is more important than we first realize, but by learning this, we can make educated decisions on what curing unit to purchase for Japanese gels. Most Japanese gel manufacturers produce high-quality units, they are long-lasting, and we can trust the components inside are some of the best in the world.
5. Other
If you are a nail technician working in public, there may be obligations your country requires you to carry out. This can include public liability and insurance. It’s essential to fulfill these, so you are protected in case anything goes wrong. One part that will be stated in your insurance is that you have followed your gel manufacturer’s instructions. This will likely be that you must use their complete system, including the lamp that they recommend.
Again we see just how important choosing a suitable curing unit is to protect you and anyone else you work on.
Let’s bring it all home and recap how to choose a curing unit for gel nails…
Consider
- #1 Intensity,
- #2 Wavelength,
- #3 Timing
- #4 Lamp design
The best thing to do is to avoid the guesswork and use the brand’s manufacturer’s recommended curing unit. Only through this can you ensure a proper cure that will provide longevity and safety for yourself and anyone else you use gel products on.
Thanks for joining us today, don’t forget to subscribe so that you are the first to know when our next topic posts.
Thanks again, and bye for now.
Content by Paola Ponce and Marta Kida Markowska
These blogs are copyrighted material, and any use of this blog is not permitted without written concern first. Some of these blogs contain affiliate links that give us a small commission when qualifying purchases are made. Thank you for your support that helps us to continue creating valuable resources and content like this.