
How-to Easy Ombre Nails | This class was a live stream… so pardon the lower video quality. Lots of tips & tricks and do’s and don’ts can still be learned on doing ombre nails in this video. However, the key to the technique shown in this class is not only Japanese gel but also using Kokoist Art Clear Gel and Tap Brush. Enjoy the no-sponge ombre technique!

Ok, you might want to take notes here. If you have a great mental notepad, that’s awesome. If not, grab a pen and paper, and let’s get to it.
This technique that I am showing you comes from Japanese gel principles, ok? This technique is how they ombre.
Tip #1:
The color you use for the ombre/gradient effect is crucial. In the Japanese gel world, this technique requires semi-opaque colors, sheer, translucent colors, meaning they are not full-coverage in one coat.
How to know if you are using the right color?
Go for pastel colors, colors that don’t have too much white unless you do a white ombre. Japanese gel companies make a “Gradation white” one of the primary uses besides all kinds of beautiful nail art. This color is a best seller in the Kokoist line, and Leafgel has its version in color K08.
I use a Kokoist tap brush for a one-color ombre/gradient effect. The brush’s hairs are goat hairs which means it is substantially firm. You can use this brush for picking up flakes or other nail art pieces.
Kokoist colors are labeled with an “S” for Sheer on the name. If you are using Vetro, any color with two stars on the label is good to use.
Step 1: Basecoat.
I start by applying one coat of base gel. The base gel may or may not help you here. I start by grabbing Leafgel color 903 and art clear gel from Kokoist (LEafgel now has its own mixing clear gel, by the way). Art clear gel is clear color gel.
Step 2: Apply the first coat of color 2/3rds up the nail.
You are going to apply a thin coat of color 2/3rds up the nail. You may be wondering why so high or why 2/3rds? The answer is because you are essentially pulling the color down in this technique.

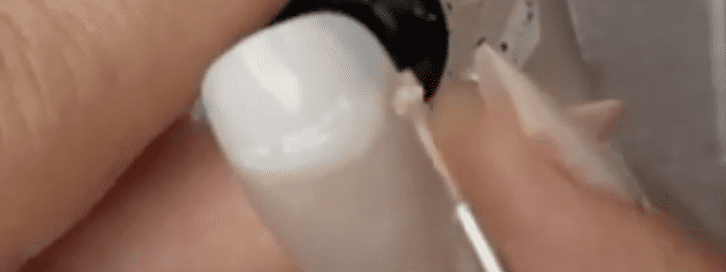
Step 3: Liner brush.
This is an entry-level gradation technique, and everyone should be able to achieve this technique. Use Art clear zero gel with the liner brush and apply a nice healthy dollop of gel on the smile line, not too much, not too little.
Step 4: Tap brush.
Using the tap brush, start working the clear gel in a vertical motion. Use little pressure and do small taps up and down to start erasing the line where the color ends.
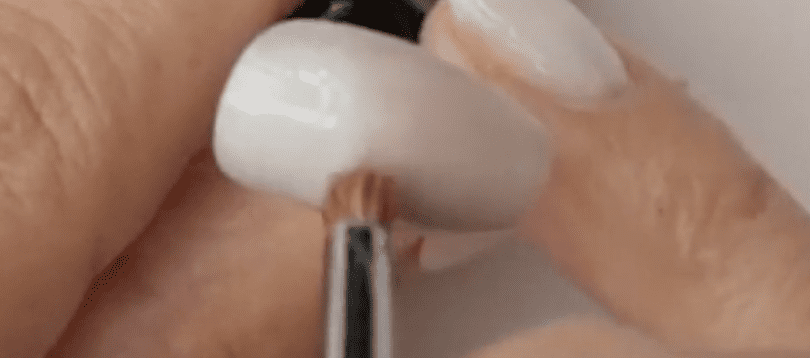
One of the reasons why I like art clear zero is because it almost does the work for you. It’s so easy to smooth out the lines; if this gel could dance, it would break it down on the dance floor.
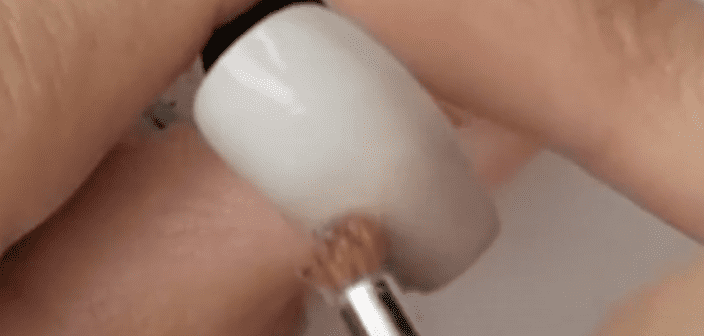
Wait for the gel to level itself and get rid of any bubbles. If you have too much product on your brush, just have a lint-free towelette with alcohol to wipe your brush with. After that, just keep working the color line, moving the brush in a very small up and down motion. When you are happy with the look, take it to the lamp for a 10-sec cure.
Step 5: 2nd coat.
If you have been with us for a while, you know it’s very important to work with the product on one side of the brush only, and I promise you that if you use sheer colors on your ombre, you will be the ombre effect specialist by this time tomorrow lol.
After the first coat is cured, come back with a slightly more pigmented coat (thin coat like the first time) and, this time, go a little less than halfway up the nail.
Step 6: Liner brush and tap brush.
Grab the liner brush again with a dollop of clear gel. You can use sanding-free base gel or topcoat gel if you don’t have this clear gel. I may work, but the self-leveling on this gel is superb.
Next, bring out the tap brush and start working the color line with micro taps up and down.
Step 7: Full cure.
Give the gel a few seconds for it to self-level, and you can come back with the tap brush to do touch-ups or fixing. After that, take it to the lamp and full cure.
Tip #2: Don’t get lost in the perfection maze.
Just like painting a french nail line, do not get lost in trying to paint a perfect line. It’s never going to be perfect, instead, set all five fingers, and then you can come back and retouch. Same here.
You might start doubting your ombre because it looks blotchy or spotty but do not stress! Topcoat is here to save the day.
Step 8: Topcoat.
Not any topcoat. Please do not use a non-wipe topcoat because non-wipe topcoats are very thin; any texture or imperfections on the nail will still show through this type of topcoat.
What you need to use here is a thick topcoat like Kokoist’s Ultra Glossy Topcoat (seriously a holy grail of topcoats); this type of topcoat fills all the dents and creases that the nail could have and still give you a nice smooth, ultra-shiny surface.
Again, use a topcoat that does require wiping off, like Leafgel’s Glossy Topcoat. This little tip will take away any ombre/gradation anxiety. I know it did for me.

Remember that we are working with Japanese gels, so there is no hurry. Take your time when applying the color and blurring it with the clear gel. Trust me, patience is key, and it’s so worth it.
Thank you so much for joining us, and I hope you are back to keep learning and showing us how your ombre went! If you are interested in the products mentioned, I am leaving the links below, use code PPN10 for a 10% discount on these brands.
Bye and until the next one…
Please note… These blogs are copyrighted material and any use of this blog is not permitted without written concern first. Some of these blogs contain affiliate links that provide us with a small commission when qualifying purchases are made. Thank you for your support that helps us to continue creating valuable resources and content like this.


