
Are press-ons even a thing? You may ask… and I say, when have they not been? Yes, the concept of a press-ons business took off in 2020, when the world… well you know.
But press-ons have been here for as long as the industry has been making plastic tips. Those whose press-ons business made it through 2020 and present… figured something out while designing their press-ons, and that is their niche!
But either way…
Yes! Nail Stylists that have found success with their press-ons business, have done so by finding a niche. Meaning they are literally creating nail sets based on an ongoing theme or style or something particularly that they specialize in, and their websites think of them as online boutiques. Just stunning.
Take for example @noona.nailsit, she pretty much took her concept of cutesy style and character design and identified it in her bio as such, and outlined the use of Japanese & Korean Gels. She then keeps a release schedule where she curates and teases her designs.

Now take @velvitnostalgia who literally started her press-ons business from scratch and has made her theme to be 3D with gilded accents using Japanese Gel.

Do you see that once you pop on their Instagram, you can easily pick-up on the vibe of their niche AKA specialty??
And what’s even better than getting new orders? Return clientele.
@velvitnostalgia shares with me that she has various return clientele orders per week! which is pretty awesome, because indeed current happy clients bring in new clients.
Now, before I continue and embark on today’s topic,
[remember today we’re talking about how to apply press-ons so that they last weeks. (because I do think that the principle of “if your nails stick, so will your clients” still applies here).]
If you’re loving this information and would like a complete guide to start and launch your own press-ons business, I put EVERYTHING in order to save you lots of time clicking around for the answers you need, in my online course The Press-Ons Lab.
After grabbing this course and if you would love even more direction in your press on nail business, the POP group is where it’s at! It is a membership site exclusively for current or aspiring press-on artists! It is peer-supported and led by one of the world’s most successful press-ons entrepreneur. Learn more about POP (Press On Portal) here.
Now there were many, I’d say from what I saw on social media, perhaps 8 for every 10 nail techs who gave the press-ons business things a go because it was the hope of an income, when there was none right?
But simply offering press-ons because your clients cannot get their nails done for 2-4 weeks and beyond was not a big selling point. Because let’s face it, many salon clients were ok with giving their nails … and frankly their wallets a break.
But again, if you just came at it from an artist standpoint, and not out of necessity then it was these stylists who thrived in the “Press-ons Business” space. Either way, I went a little bit on a tangent here, but I wanted to give you a bit of context and get you pumped in case you were thinking of joining us on February 2nd for the free workshop.
And…It’s been a while since we’ve brought up the topic of press-on nails here, so it felt like a warm-up chat about the topic was due.
Alright, so without further ado let’s answer the big question of
How to make your press-ons last for weeks?
Let’s go step by step-by-step.
The secret is to prep your nails like a pro, and if you’re not one or you’re just a nail enthusiast, no worries, I got you. I’m going to give you all of the pro tips.
Step 1: Cleanse
This includes washing your hands with soap to remove any dirt and/or some oils from your skin and nails. Make sure they are completely dry before starting.
Step 2: Cuticle Prep
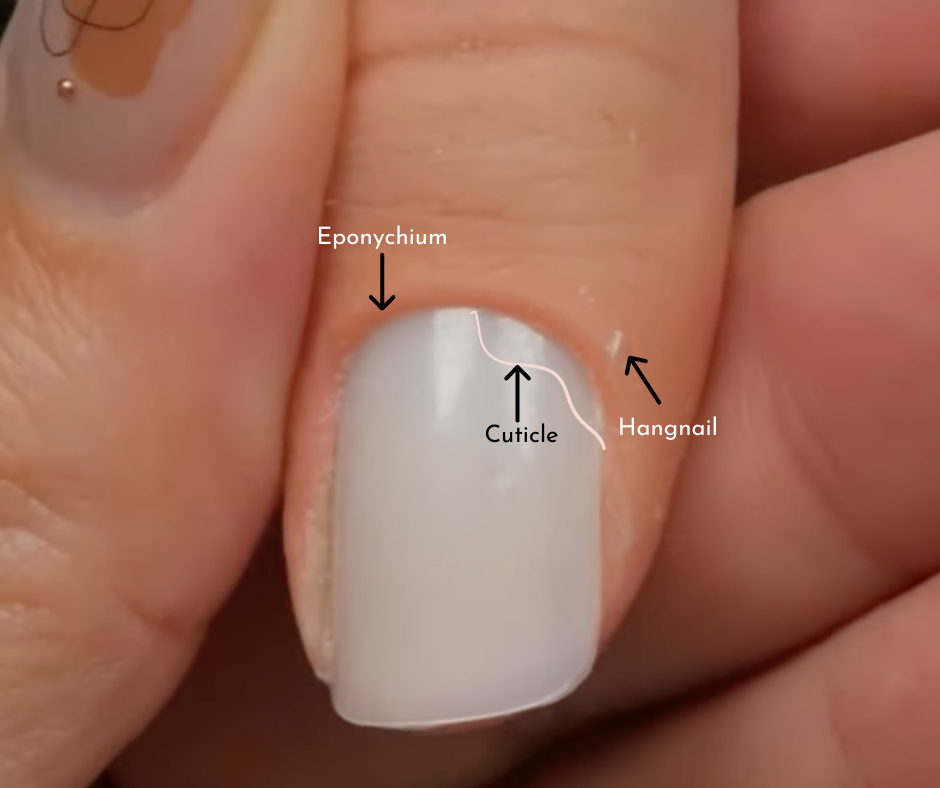
Now let me help you identify what is cuticle, and what is not.
Cuticle refers to the dead skin that is actually applied to the nail plate. Eponychium refers to the area which folds around this cuticle, and it is typically living skin. Once in a while, you’ll have a hanging nail sticking out from it, and that is all you need to nip most of the time. The most important thing is to push this area back with a cuticle pusher. Keep in mind that this eponychium area does regress and you’ll have to push it back one last time in a moment.
Step 3: Buff
Now listen, if you take a coarse file and shred your nails to give them texture, would they last, absolutely, but I’m sure you and I both care about the integrity of the nail. Instead, I want you to take a coarse buffer, if you cannot tell what grit is, if it feels gritty that’s the one, otherwise, you’re looking for a 100 grit.
Do not saw your file back and forth aggressively, as you will smooth the nail out; rather than give it texture. A little bit of texture is all you need to make press-on nails last.
Step 4: Dust-off
You may be wanting to skip this step by just grabbing some alcohol and napkins and scrubbing away, but caution, leaving the smallest of dust particles behind is what ultimately causes inconspicuous lifting. Meaning that lifting, you simply cannot figure out, just keeps creeping up again.
So the most thorough way to start this dusting-off step is to grab a dry disinfectable manicure brush and start brushing away the dust one finger at a time.
Then, it is time to saturate your brush in alcohol, having a pump dispenser is helpful here. You can see which I use using my Amazon link.
And … It’s time for step 5.
Step 5: Dehydrate
This next step involves Isopropyl alcohol and preferably a lint-free towelette, and scrub your natural nails of oil and dust.
For press-ons 70% alcohol is fine, but if you can get 90%, even better as it will dehydrate the nail further, and that is because 70% alcohol means there is typically 30% water, and we are trying to get rid of water, not add more.
If you don’t happen to have alcohol, acetone will work too. I typically don’t prefer it because it does dehydrate more and personally, I believe the nail does not bounce back and replenish itself as fast as it does after alcohol. Also, if you use acetone continuously, over time you are more prone to make that nail brittler.
Step 6: Push back the eponychium one last time
Once you’ve given your nails a scrub, it is time to use that same towelette to push back your eponychium area. Look at how much you’ve grown already, you know what the eponychium is! I told you I had your back!
Step 7: Apply glue… the right glue, on the nails!
Listen, glue hates me, we literally don’t stick (Ha! Pun intended.) After giving it a try for years I decided to try something new. The Dashing Diva Gel Glue! I know! What? Does such a thing exist? That’s what I said!
Find the Dashing Diva Glue and other of my press-ons faves here.
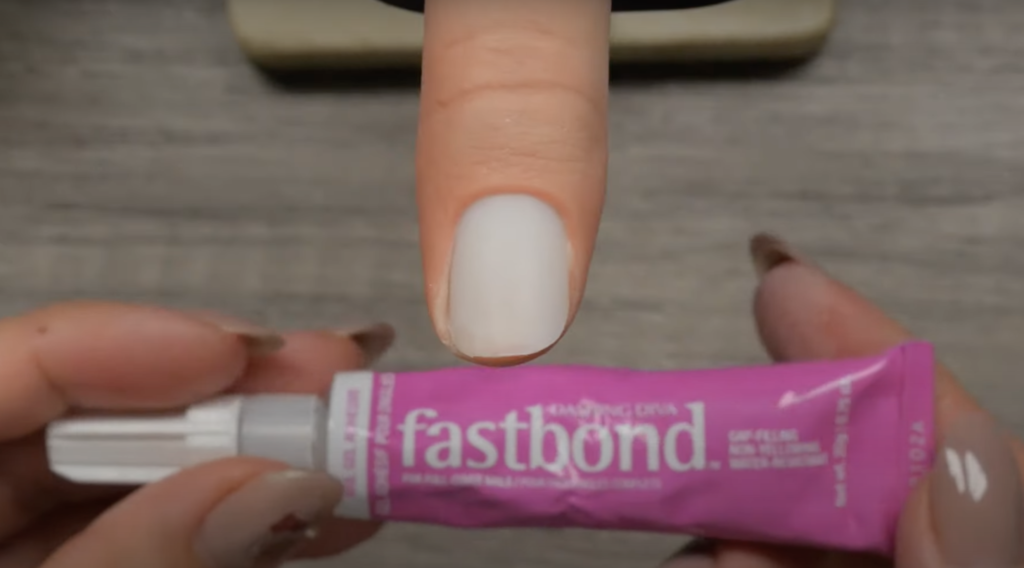
I really like this type of glue because it is thick, and so it fills in any gap between the nail plate and the press-on.
I personally like to apply glue on the nail plate, that way I know it is where it needs to be vs. on the nail tip where I have to do more guessing work. And notice that I do center my glue so that it does not run into the cuticle area.
Step 8: Hold w/o moving a single time for 10 secs
This is your last step! Don’t ruin it. Once you’ve pressed on your nail, do not move or you will interrupt the cure time, and you will need to buff both ends, your natural nail, and the plastic tip to restart. You do not have to squeeze the nail super tight for this nail glue to adhere.
Here’s a cool product recommendation: If you are a consistent wearer of press-ons nails, and you would like to wear them over and over again. I truly recommend you use a small portable efile like this Melodysusie one, to clean up the nail glue from behind, once you’ve removed the press-ons. I hope to do a video of that soon for you. Either way, this Melodysusie is powerful, super easy to operate and there are no cables attached to it! Great for DIY services but even if say, you’re a pro and need to have a spare this is a great option. Let alone a breeze to use on pedicures. I’ll leave a link here (code: PPN10k) for it in case it’s a fit for you.

And that is it for all of the pro-steps, tips, and tricks to making your press-ons last! Moisturize and you are done!
My final tip is an after-care one, and that is… to wear your dishwashing gloves every single time you wash your dishes. Nails expand when they absorb water, and this constant expansion and contraction can begin dislodging your press-on nails prematurely.
Guys if you’re seriously considering a press-ons business you don’t have to be a licensed nail tech to start, there are other legalities for opening up a business, but you don’t have to be in nails school for months to get started.
Start with these resources:
If you’re loving this information and would like a complete guide to start and launch your own press-ons business, I put EVERYTHING in order to save you lots of time clicking around for the answers you need, in my online course The Press-Ons Lab.
After grabbing this course and if you would love even more direction in your press on nail business, the POP group is where it’s at! It is a membership site exclusively for current or aspiring press-on artists! It is peer-supported and led by one of the world’s most successful press-ons entrepreneur. Learn more about POP (Press On Portal) here.
Thank you so much for hanging out.
These blogs are copyrighted material and any use of this blog is not permitted without written concern first. Some of these blogs contain affiliate links that provide us with a small commission when qualifying purchases are made. Thank you for your support that helps us to continue creating valuable resources and content like this.

This is all so true. A lot of people who try press on nails for the 1st time don’t realise just how important prep is and if not done correctly they just won’t last.