
I often get asked, and almost confronted about whether or not you can actually build long gel extensions with soak-off gel AKA soft gel. And the answer is yes! But it does take some practice and a very methodical step-by-step. Every gel nail certification I teach has a lesson on how to form gel extensions with the soft builder gel of each brand.
And I wanted to start out by stating this because today, I’m actually going to be using a polygel hack method to create an extreme length gel nail extension. I consider anything to be the extreme length for the wearer if it is at least twice the size of the nail plate that is actually attached to the nail bed.
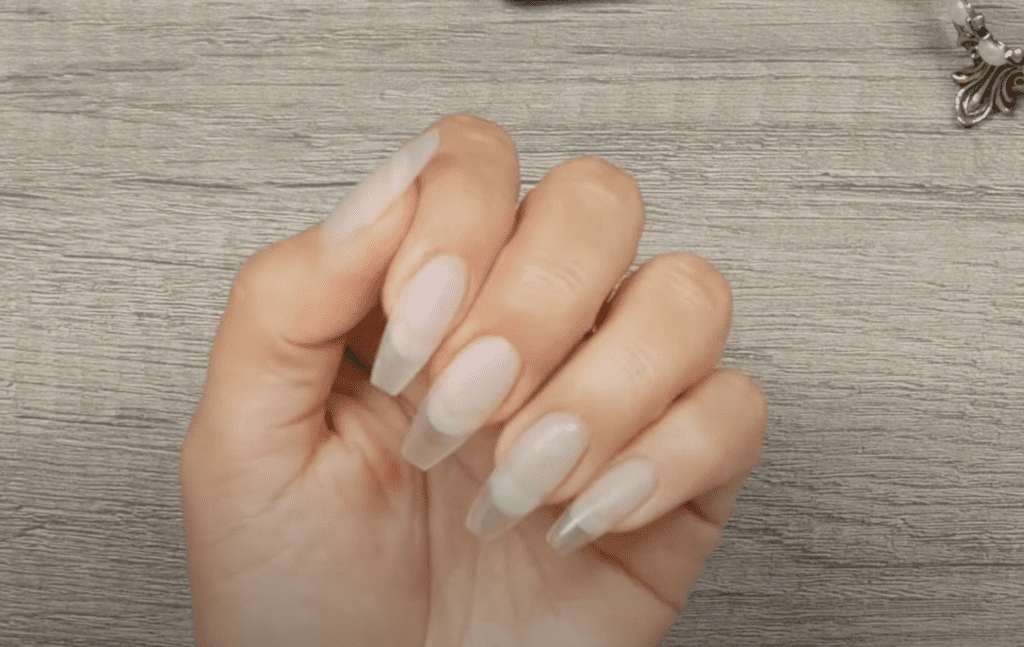
So yes, this is different for every person. For these lengths, I recommend you do full coverage tip extensions or the polygel method I will be showing you today.
If you’re wondering, why not just do the entire gel extension service with polygel? That is because of two things:
#1 I want to essentially only use the polygel to essentially create a plastic nail tip. (Yes, the old school half ones). So I thought, Heck!… if it’s game to use plastic tips for our soft-gel extensions and they’ll still be called “soft gel” extensions, then it is definitely game to use poly gel to create extreme length soft gel extensions. Am I right, or am I right?

#2 We are wanting to do free-form extensions using soft gel, and I’ve done this in the past, you can click the right card for that video. What happens is that at a certain point the soft gel extension bends a little too much for comfort. That is just the chemical structure of soft builder gel. Although it is indeed strong, it maxes at about half an inch or, at double the length of the nail plate… and there you go, thank you Lord for polygel.
Let me give you “The Polygel Hack” recipe for long gel extensions:
- To set up for this application you can use any of these bases; my go-to brands are Leafgel, Kokoist, Vetro. Use the base gel that corresponds to the builder gel you choose for the extension. Also get your curing lamp ready to go.
- Prep the nails, push the cuticle and clean under the free-edge. Finish with a buffed nail and then wipe them with 90% alcohol. You want to make sure that the nails are free of any dirt, oils, or debris before applying products to avoid lifting.
- Apply a generous thin (but not too thin) bead of base gel onto the nail. Make sure you coat the entire surface of the nail because, if builder gel comes in contact with an area without base gel, it will lift. Remember: Builder gel does not have adhesion components. Repeat in all 10 fingers.
- Give each hand a full cure (30 sec.).
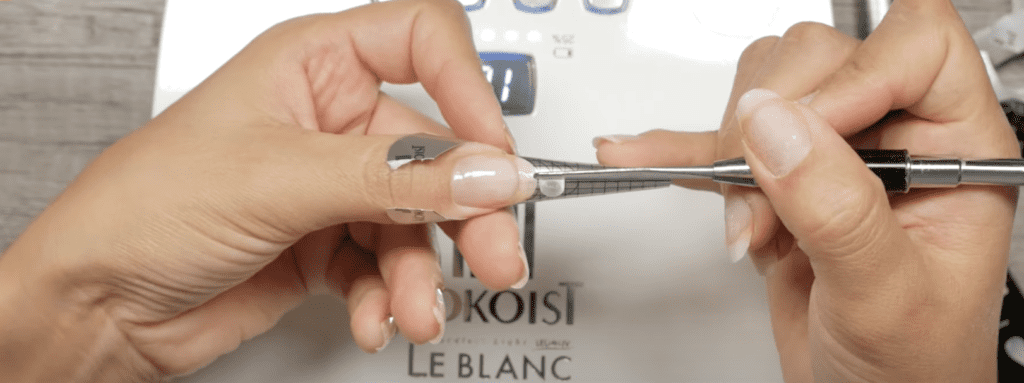
- After that get your polygel tools ready. I am using 90% alcohol in a dappen dish and nail forms. Also, I like to pre-set nail forms i.e. remove backing, stick the back ends together, roll them a little, pinch them and put them to the side. You can do all 10 fingers or 5 at a time like me.
- Now it’s time to attach the nail forms. I like to pre-pinch them so the form stays even, because if it doesn’t, then the nails come out slanted or crooked. Make sure you connect the wings and that you have a straight line down the middle of the nail bed so that your extension is straight, so take.your.time.
- Grab a bead of polygel with your spatula and place it on the form, place it where you want the length of the nail and work it towards the free-edge. Ive tapped some alcohol on my brush, minimal, just enough to keep the brush moving because if you just tap the polygel it will be sticky.
- Flash cure for 5-10 sec.(no more than 10 sec) so you can pinch the nail to give it a c curve shape. Continue doing this on the rest of the fingers.
- Once you have all the fingers done flash curing in between, give the hand a full cure of 60 sec so everything is nice and fully cooked. Take them out of the lamp and peel the forms off.
- Now that you have long and slender extensions wipe them off with 90% alcohol pulling the soaked wipe down so you don’t get any uncured product in the cuticle area.
- It’s time to shape them. Use a coarse or medium-coarse file 150-180 grit to shape them now, that way you have control of where the product goes. If you leave jagged edges and they’re all different sizes, then you will have to work longer and harder to achieve a uniform smooth clean look in your entire set. Give the nails their general shape here so you have something of a guide to balance these nails. Perfection is not needed here.
- Make sure to buff the entire nail to prep it for the balancing part. Don’t forget “Gel will not stick to shiny surfaces”. Dust them off with a wet brush (wet with 90% alcohol) and remove all dirt from the top and bottom of the nail. I like to grab a towelette and wipe the cuticle area, the free edge and side walls.
- Time to reach for builder gel (try to stay on brand or use the ones you know work well together). Meticulously apply a thick layer on all nails and self level them a little so you can easily build the nail and an apex with the next layer of gel. This thick layer is also making sure that the free edge and the body of the nail plate are actually connected and not broken. I call it “the insurance policy” layer, so don’t skip it.
- Full cure all nails.
- Next, you start building. Coat the nail with a thin layer of gel (the wet layer) and then come in with a large bead to start building the body and apex of the nail. Tip the nail down and move your brush side to side in a “U” motion. Remove excess gel from the brush and use the edge to help the gel self-level by moving the brush up and down the nail in parallel motion (sidewalls too!). Tip your hand upside down and work your gel self-leveling hand moves.
- Full cure and move to the next finger and complete all 10. Finish filing is optional, because of the self-leveling magic, you should end up with leveled smooth nails.
- Violà! Beautiful long polygel extensions ready for color or nail art.
Click the video above for the step-by-step for extreme soft gel extensions using the polygel hack method.
Let me know in the comments below, What do you think of this method?
To me, they look and feel wonderful because we overlaid them with soft gel. They feel nice and light. If you’d like to learn more about my soft gel extension tips & tricks, and potentially enroll in my upcoming nail course, sign up for my newsletter below.
See you in the next one!


