
You love the look of structured gel nails. The beautiful apexes and smooth surfaces are just oh-so desirable. You see a quick snippet on Instagram of the how-to on structuring gel nails, and you try it yourself… only to go South-literally! as the gel starts running into the side walls. What is going on? Why can you not keep control of your gel before curing it?
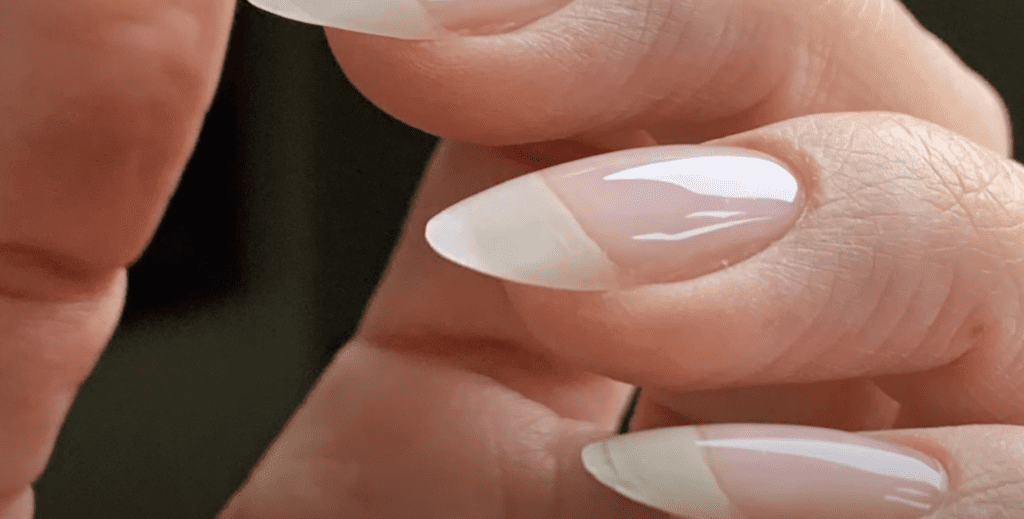
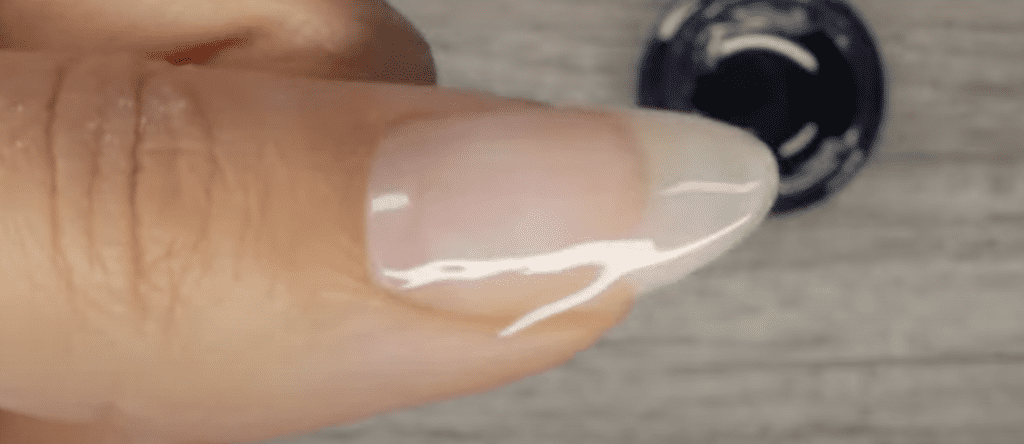
This is called overflow, whenever your nail gel runs into the sidewalls and eponychium of the nails. Keeping your gel from overflowing into the sidewalls is soo important. Not only is it necessary to achieve no lift nails and, of course, a beautiful structure, but also because continuous uncured gel on the skin can lead to an allergic reaction.
You must always control the gel when using gel to structure the gel nails. Overflow is not an option, and today you’ll be learning the most important reasons why your gel keeps overflowing onto the side walls. Let’s begin.
We’re continuing with our one-video-per-day challenge this month! That’s right! One video each day, for a total of 31 consecutive videos!
If you’re all in on soft potted gel nail systems or being a specialized gel nail stylist in these systems. I got your back these next 30 days and, of course, in this channel because those are revolving topics here!
In a recent class, one of my students asked why does her gel overflow? She was working on a gel overlay, and She thought that no matter how meticulous she was, trying to build an apex, the gel kept flowing into the perimeter of the nail, the lateral nail fold, or that eponychium area. I usually say the perimeter.
There are three reasons why this may be happening.
1. Dry skin around the perimeter of the nail.
Even though you’ve done a thorough nail prep where you think you have, and even the nails may look well manicured, if you look closely, when you pull back the skin on some of them, you will be able to see a little bit of dry skin. That’s going to attract the gel. Hangnails are going to attract the gel like a magnet. They’re just attractive. I don’t know what to tell you exactly why this is, but it just does that.
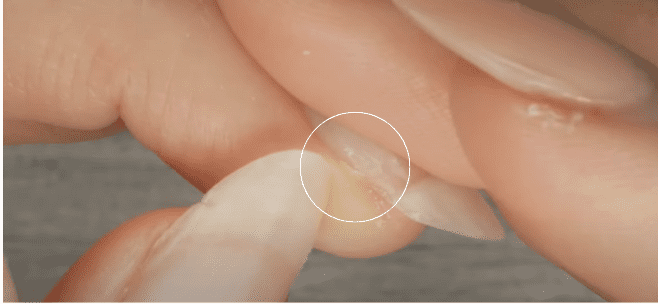
Okay? So, for instance, if you take your base gel, you might be going through that nail. Then by the time you get to that area, you got to get close to your slip layer, that little piece will attract it and hook it, and the gel will start seeping there; because now it’s got a little hand saying, ” Hey, I’ll take you along now we’re together” so it starts pulling all of the gel.
So that’s reason number one.
2. The slip layer
The slip layer is just a wet layer that you apply before leveling. You are essentially creating a messenger so wherever the gel is, you’re telling your next beat of gel or dollop of gel to go there. If it hooks that little bit of skin, boom, you will have overspill.
Let’s say you applied your base gel thoroughly on the entire nail, and you accidentally touched the skin, right? Which, of course, we want to avoid, so we don’t become allergic over time.
We don’t want this product on the skin. Well, then you’re probably, especially if you’re doing this on yourself, you’re probably going to wipe it off with your nail (be careful where you put the excess because you don’t want to put that or rub that anywhere, like on your skin, to avoid any allergies, of course). You may have even grabbed a tool like your cleaning brush; this is a French cleaning brush. I have it linked in my Amazon store if you’re interested. I cannot work without this brush.
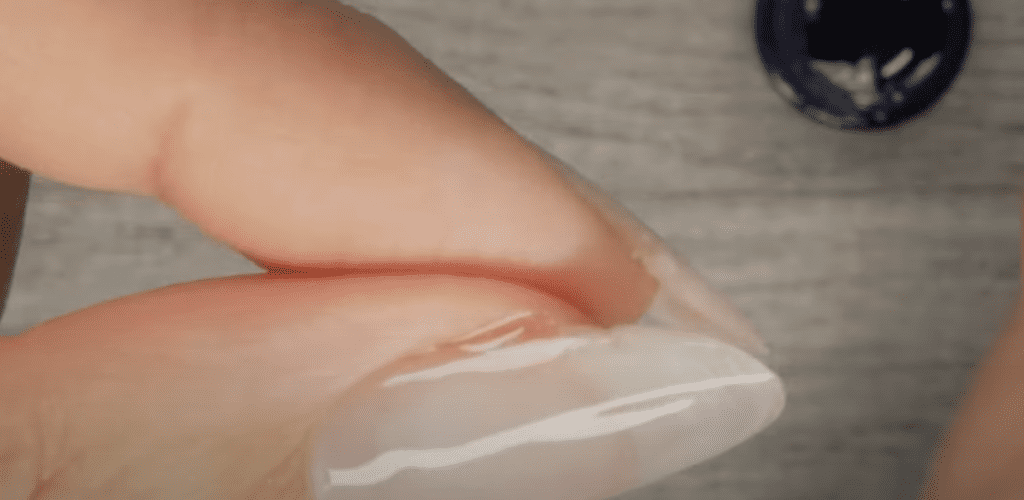
And you might have just been taking it dry and be like, oh, it’s clean, right? Well, any one of those three cleanup scenarios leaves a little bit of gel behind. Can you see it? It’s glistening, and it’s bright and shiny. That is still gel. That’s going to attract the other gel.

Remember, the slip layer is like a messenger layer, saying: “Hey, everywhere I’ve been applying the gel, you should self-level there.” Okay? This next dollop of gel is going to self-level. Notice I even have my fingertips down a little bit, and It doesn’t stop; it’s leaking. It keeps going into that area that even though we did a little cleaning, it continues to go there. So how to fix that?
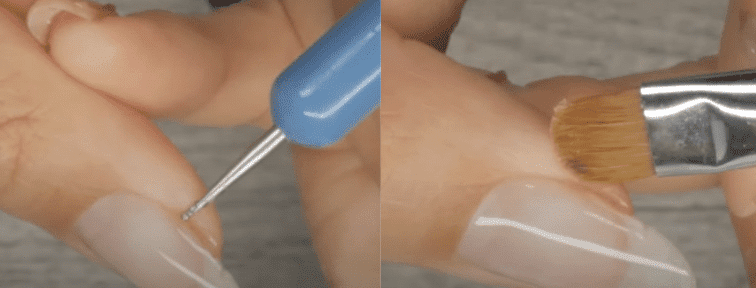
If you are going to use your nail to wipe off and then responsibly put the excess somewhere, or the more professional way, grab a tool and clean that, or the French cleaning brush. Soak this in a little bit of alcohol, a little dry wipe, and wipe off the area. That’s going to take care of it.
The next thing you can do here is immediately going into curing, okay? Because that’s going to prevent the excess from starting to collect there.
What I recommend is that you remove the entire overlay. Because once you get this hot mess, gel running into the skin like crazy, it will be hard to clean it all up and not have any gel still on the skin. As we saw, we cleaned this area three times, and there was still gel on there.
Okay, so I would recommend if you have a big, big mess like this, instead of grabbing your French cleaning brush, soak it in alcohol because you’re like, oh, no, my timing. I got to get going. My next client is going to be here soon. Everything else might take me a little bit of a long time. Okay, fair enough. Life happens.
I recommend you take your towelette, spray that with alcohol, and very carefully take it all off. Grab another towelette to avoid spreading all the previous gel on yourself.
Is it a waste of gel? Absolutely. Do I want you always to be doing this? Absolutely not. So you want to avoid this entire scenario by applying your slip layer carefully within the perimeter of the nail and ensuring that once you’ve done your cuticle prep, you come back with your alcohol wipe.
A clean nail with no hang nail, no cuticle on the nail plate, no skin, or nothing that will attract that gel and pull it into itself, right? So please give it a good scrub, get rid of that, and start over.
3. Tilting downwards
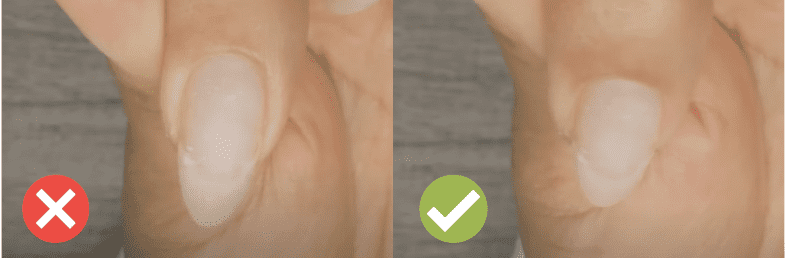
Okay. Lastly, the third reason you may be having overflow is that you’re not tilting the nail downward anytime you’re doing a service, a gel service, especially one that will accumulate more gel on the nail.
Like a structured overlay or a self-level application, we teach these techniques inside our Master Gel Nails program. You are going to point the fingernail down. Whether that’s yours or your client, it must point down.
Okay. Is it a little awkward, maybe, right? You’re working on your client’s hands, and rather than just working on the nails flat, it should be like right there. It should be pointing towards the table. It should be pointing down. And that’s another way you will prevent overflow from the perimeter of the nail.
If the gel touches the skin even just slightly, it will lift. It does not matter if it’s just a little speck of cuticle it touches or an invisible cuticle on the nail plate; it will lift. The gel is not meant to attach to the skin because skin, whether it’s on the nail plate, so anything like that, even that little white spec that’s going to cause lifting, believe me, we’re not being excessive, obsessive, or paranoid. We’re being real.
This is going to create lifting, okay? And then you’ll wonder, I’m doing everything right, but guess what? You’re not putting on your magnification vision and pushing back so that you can see if there’s anything scraggly sticking out or dry cuticle still on the nail plate.
All right? So those are three reasons why you may still encounter overflow when applying your gel nails.
Thank you for watching.
If you need more direction in your nail career, I encourage you to join my free masterclass. You can watch it immediately for free right now after signing up. Thank you for watching, and I’ll see you tomorrow.
____

Content written by Paola Ponce
Loved this blog? Then I think you’ll love learning more about my journey as a specialized gel nail solopreneur in the nail industry. Click here to get instant access to my free masterclass. These blogs are copyrighted material, and any use of this blog is not permitted without written concern first. Some of these blogs contain affiliate links that give us a small commission when qualifying purchases are made. Thank you for being so supportive, which helps us to continue creating valuable resources and content like this.


