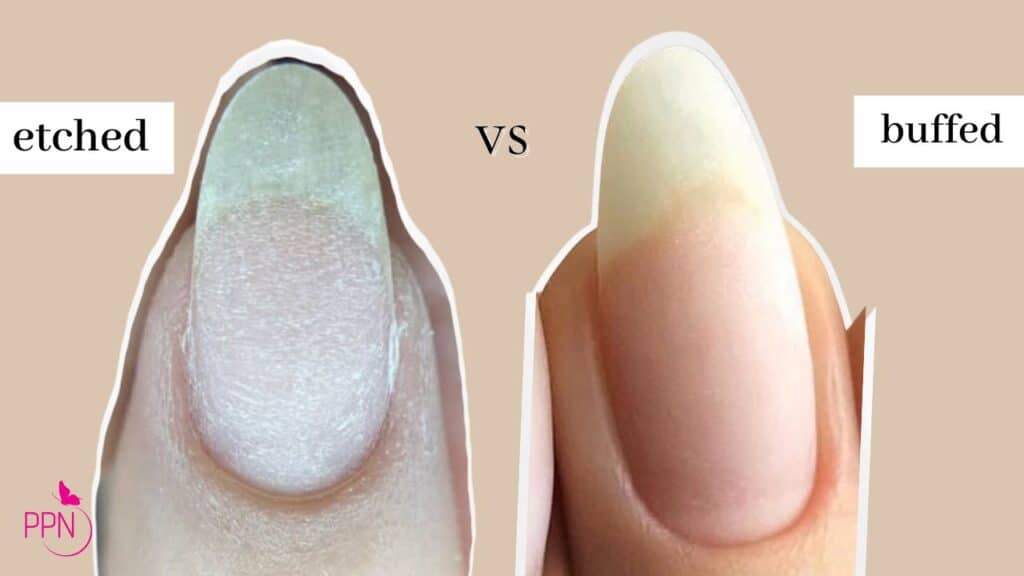
Correctly prepping the natural nail for application is VITAL for long wear. The nail can be either buffed or etched prep. What you choose is not a matter of preference or opinion, it is a matter of what the manufacturer actually recommends for proper adhesion.
For years (10 years now!) I have buffed prep, and continue to love this gentle approach to servicing clients.
And I’ve confidently done so because after learning my products thoroughly via brand certifications (P.S. my next one is Kokoist and Nail Thoughts in late October-Nov., sign up to the waitlist here.), I learned that, buff prep is OFTEN all that is required for proper adhesion of these products.
For you and the products you use, etch prepping may be the appropriate way to prep. Again, just know your instructions.
HOWEVER, there are two scenarios I actually will etch the natural nail for…
- Extensions
- Semi-hard products.
🌸Extensions…
Wearing long nails for the first time ever or in a while, is like wearing heels for the first time. You’ll be a little awkward walking in them. Likewise, a client going from short to long in one visit is naturally going to be bumping and flexing their nails, more than we would like them to. By etching the nail, we give the enhancement more texture to hang on to.
🌸Semi-hard products…
One of my all-time favorite base gels has been Bio Sculpture Clear Gel. It is a true “rubber” base, with a silicone-ish feel after curing that is ready to flex at impact. But, for the last few years I’ve moved fully on to Japanese Gels and while there are some rubbery-type bases some wear a little more semi-hard, which means a little less flex.
And so when the product doesn’t flex too well with the natural nail, it’s going to want to tear off from the nail plate, which translates to lifting.
I’m going over all the detail of buff prep vs etch prep in this week’s video.
Overall, here’s what I want you to take away from this conversation.
- Your prep is based on the products you use. A brand certification can ease your mind as to what to use.
- Sometimes you’ll make modicfications based onyour experience
And perhaps the most important is this…
How much to etch or buff prep?
It’s this simple. Look at the tool you’re using to prep. The grit you see on it is the texture you want to imprint on the nails. Do it gently but thoroughly, and as long as you didn’t smooth or shiny buff, trust that the grit of your tool has been imprinted on the natural nails, even if you think you don’t see it!.
I hope this week’s topic helped. Wishing you the best week, and remember…
P.S. Are you a nail enthusiast or pro looking for the strategic details for booked solid success or $100k years as a nail tech (or maybe you want to re-build your clientele after moving?). Well, in my newest program, The Roadmap, we’ll be getting into the nitty gritty for you to streamline your nail biz decisions to achieve your goals-faster. To stay in the know, sign up to The Roadmap Waitlist here. Launching Aug. 4th.

Content written by Paola Ponce
Loved this blog? Then I think you’ll love learning more about my journey as a specialized gel nail solopreneur in the nail industry. Click here to get instant access to my free masterclass. These blogs are copyrighted material, and any use of this blog is not permitted without written concern first. Some of these blogs contain affiliate links that give us a small commission when qualifying purchases are made. Thank you for being so supportive, which helps us to continue creating valuable resources and content like this.