
If you specialize in the use of soft gel… stop using carbide and arbor bands!
Leave those for hard product specialists like acrylic and hard gel nail techs.
If you are a Japanese Soft Gel guru. You are a soft gel nail specialist, so some standard procedures will not apply to you when doing nails.
For example, while many will soak off gels, as a specialized gel nail stylist focusing on Soft potted gel, efile removals are much more effective than soaking off. The gels in a soak-off system are slightly denser, so a bit thicker, allowing you to leverage that slight thickness to file down a soft gel enhancement down to a very thin layer on the nail.
So just like certain techniques must be adjusted as a soft gel specialist, your tools will need to also—specifically your efile bits. Think… Effective over aggressive.
And because of this concept of effective over-aggressiveness, I created a very niched-down efile manicuring course. It is called the Efficient Efiling Masterclass, and I created this course specifically for soft gel nail specialists.
Alright, in today’s topic, we’ll discuss the 2 types of bits you will need when regularly working on premium soft gels. Let’s begin.
So let’s take it from the top, why no carbides or arbor bands when you’re a soft gel specialist? Remember what I said earlier, leave the carbides and sanding bands for hard enhancement specialists. This is why…
#1 Carbides are meant to shave off hard-glass-like gels efficiently w/o too much heat transfer. They shave any material, whether nail product or natural nail, scary fast. And when working with soft gels on natural nails, you’ll want to have control, not the bit. Now you can start your soft gel enhancement efile removal with a carbide. I’ve done this for years and teach this in the Efficient E-filing Masterclass, but when you get down to about halfway through removing the gel, you’ll want to switch over to ceramic.
#2 Arbor bands are meant to etch the natural nail. They are supposed to roughen and leave the natural nail textured for the best adhesion. That is not at all necessary when using soft gel nail systems.
Let’s dive into the two bits you’ll need as a soft gel specialist!
Bit Type #1 Diamond
A true diamond bit is a metal bit coated with diamond particles. Yes, a true diamond bit is coated with genuine diamond particles. Diamonds are believed to be one of the hardest if not the hardest, naturally occurring substances found on Earth.
But strangely enough, although you would think this may make them kind of abrasive on the nail, they are not. At least not a true diamond-coated bit, and that is because of how fine the particles are ground to. On your diamond bits, you want dusty, not chunky particles. And so if you buy a diamond bit, and you can see its roughness, then chances are you are not working with a genuine diamond-coated bit.
So what are diamond bits used for? Nail prep and nail prep only. Remember it is diamond dust you are working with.
For me, there are only 3 diamond bits I will ever need:
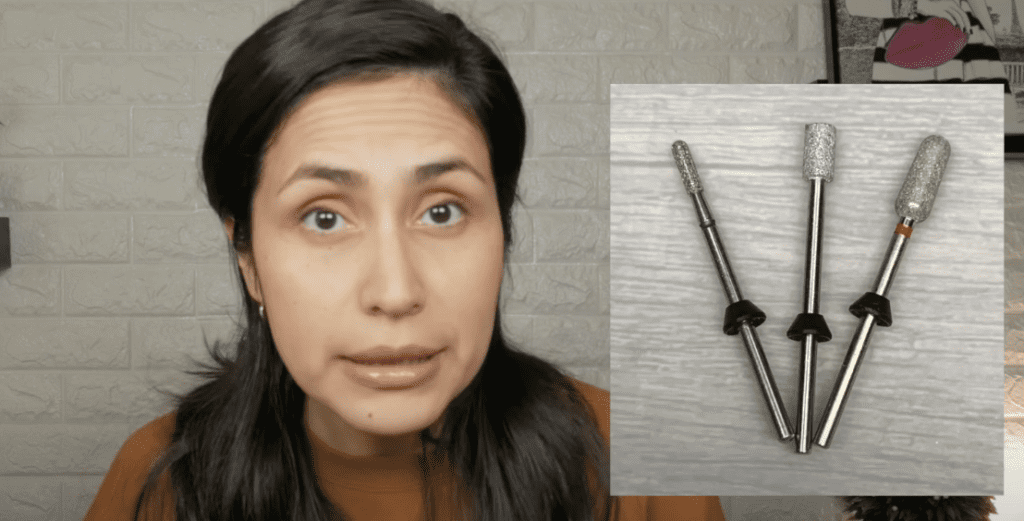
#1 The Sciver Bit
The Sciver Bit is a thin cylinder bit coated with diamond dust. This is a great ebit for cuticle work. Remember, the cuticle is on the nail plate, not around. The skin around the nail is called eponychium; if you’re going on the sides, those are called lateral folds. This one is great not only for removing cuticles off the nail plate quickly and efficiently. The cool thing about this bit is the rounded tip. With the proper training, you can use the rounded edge to gently push back the eponychium without cutting the skin around.
Let the tool do all the work; you don’t need to apply pressure. I like to use a medium-grit Sciver bit or even fine grit. If you increase the speed, you’ll still remove nail that is not supposed to and create friction heat. I use this bit at a relatively slow speed; I go over all these details in my Efficient Efile Masterclass.
#2 The Baby Barrel
The baby barrel is precisely that, a smooth flat-top barrel. You can use this one to push back the eponychium as well. I like to use this one, especially when I’m doing a rebalance or when working with full coverage soft tips because the length of the bit is the size of the regrowth so it’s very efficient to fit that area between the old product and the cuticle area and saves you time. You can also use this bit for natural nail prep, thick cuticles, or overgrowth of the eponychium. I would use this one for that.
#3 A fine buffing bit
This cylinder with rounded edges fine diamond bit. The shape doesn’t really matter, but make sure you get something that is fine grit. I use this shape because it allows me to keep pushing back the eponychium and use pressure safely. You can get this bit at Nashly Nails. You can use my code PPN10 and get 10% off your purchase :).
I used to use the silicone bit before, and that’s great for personal use. Companies have been having issues sourcing that one, so the next option is if you want something disinfectable to be able to use it on clients going to be a diamond bit.
Again, take it from someone that has tried every bit. I tried all of them at the beginning; I tried the ball bit, the flame bit, etc., but the ones that I always felt comfortable with when it came to speed were the Sciver bit and the Baby Barrel bit. I don’t feel like I will damage the skin, and can work fast and efficiently.
Now let’s move on to the second type of bit you need as a soft gel specialist.
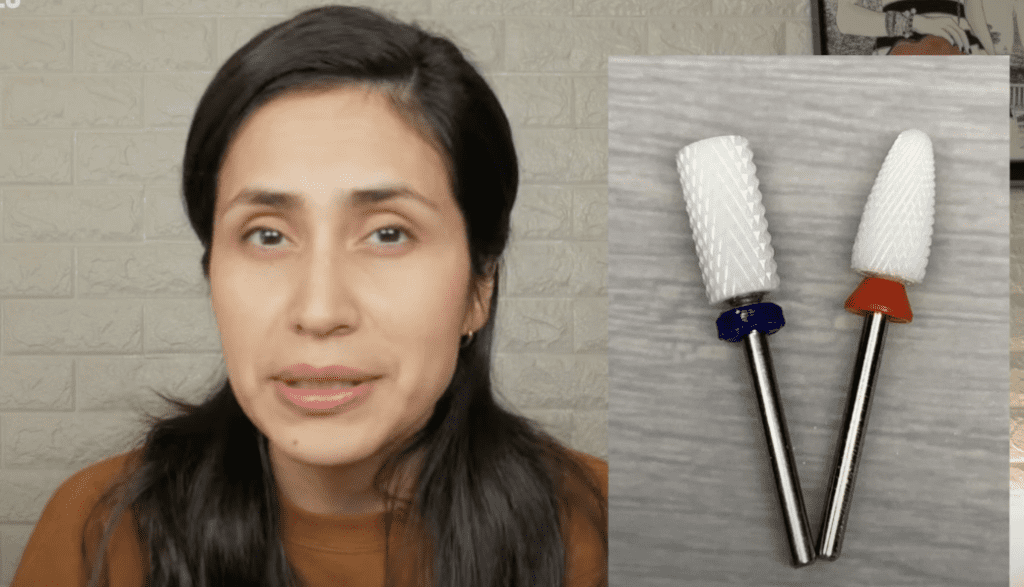
Bit Type #2 Ceramic
I am still impressed by the amount of gel nail techs who have not moved from carbide to ceramic or don’t even use ceramic. And as I already mentioned, there are a couple of occasions when I would use carbide and very rare ones when I would use an arbor band, but if you took those away from me… NO BIG DEAL. All is well as long as I have my diamond and ceramic bits.
When it comes to ceramics, I keep it simple; I only need two,
#1 A flat medium barrel
I like a flat medium barrel. I like a medium barrel with a smooth rounded top, just for the extra safety measure to avoid cutting the skin around the nail. This bit is going to help you remove product flat. That’s what you want when working with soft gel nail systems; we go over that in detail in the Master Gel Nails Course.
If you already use it, you want to remove the product flat to rebuild the apex. If you have dips and creases after removing the product, your new product application will dive into those dips and not be able to structure a nice, healthy apex.
So, I start with this bit and switch to the fine corn-shaped ceramic bit as I approach the natural nail.
If you join us in the efile course, You’ll see that I started with carbide and then switched to the corn-shaped ceramic bit; either one is ok, but the main point is that I don’t like to remove the product completely with the carbide bit. That’s like taking a very sharp knife and completely cutting the product off the nail, in case you make a mistake and shave into the natural nail.
#2 A fine corn shape
I like a fine corn shape in fine and extra fine grit because I won’t wear it down super fast. This corn shape will not allow me to remove the product flat unless I use it vertically. Still, I like this shape because once I remove about 60% of the old product not, I can go with this bit and get in between the lateral nail folds with the pointed tip and remove the product in those thigh areas. It allows me to be more detailed and not remove so much because it’s a fine grit.
Your carbide and ceramic bits start to wear off at the three-month mark, so if you or the customer are experiencing heat on the natural nail, these bits have gone too smoothly. If you use your bits regularly, like every day, you should use them every three months regardless if they are cardibe, ceramic, or diamond.
So if you are a soft gel nail specialist, do make diamond and ceramic bits your friends!
They are efficient, more gentle tools than those needed for hard gel nail techs.
Where to buy? I’ve been buying my diamond and ceramic bits from Nashlynails, which carries the world’s best line of bits and implements, in my opinion, and that is Staleks. I’ll drop a link and our affiliate code down below. They sell out fast, so I’ll also link you to my Efile & Implements Guide here. In this guide, you can compare manicure tools, efile bits, and machines I’ve used over the years. After sharing our needs for these specific bits, Daily Charme, where you can use PPN10 code again ;), has also started carrying 4 of the bits we talked about today, and otherwise, Amazon also has some of our recommendations.

Content written by Paola Ponce & Fabiola Saucedo
Loved this blog? Then I think you’ll love learning more about my journey as a specialized gel nail solopreneur in the nail industry. Click here to get instant access to my free masterclass. These blogs are copyrighted material, and any use of this blog is not permitted without written concern first. Some of these blogs contain affiliate links that give us a small commission when qualifying purchases are made. Thank you for being so supportive, which helps us to continue creating valuable resources and content like this.

![[[ Nail Thoughts X Kokoist ]] Bottled Gel Launch | All COLORS SWATCHED](https://paolaponcenails.com/wp-content/uploads/2020/11/ntswatchesnewthumb-1024x575.jpg)
