
Tiny Ring Nail Art is so stinking cute! And personally, yes, the best products to use to achieve the softest looks are soft gel.
Typically you can create the look just by using 3D gel to create the parts. But today, I want a dainty, blingy ring, so I will use the best crystals… Swarovski Crystals! We will be embedding these into 3D Gel; you don’t need exactly the one I am using. You just need a thick viscosity gel; even a builder gel would work.
And if you fear crystals because you think they will pop off, no worries. The key is to concentrate the gel very diligently around the sides of the crystals and cure quickly in between, but either way, I’m getting ahead of myself… let’s get started.
Very quickly!
If you are still interested in the upcoming Kokoist Certification, enrollment for it closes on April 20th at 10 pm EDT. If you’re one of the few still on the fence, I’m hosting a free quick Kokoist class in a few days, so keep your eyes on your inbox. I will send you an invite.
But if you’ve meant to sign up, here is that enrollment link again.
Here’s The Recipe For This Look
Here are all the materials you will need:
- Wax pick-up pen
- Boba Gel Low/High Kokoist (or another 3D gel)
- Lint-free surface/silicone/form backing
- Cuticle pusher Staleks
- Daily Charme crystal embellishments
- Caviar beads
- Kokoist Chrome Pen
- Eyeshadow sponge applicator
- Lint-free wipe
- Cleanser
- Kokoist Ultra Glossy Top Coat
If you want to test Kokoist products, use code PPN10 for 10% at checkout.
Alright! Let’s begin.
Here is the step-by-step:
Step 1:
Roll a dollop of the Boba gel between two non-sticky backings until a thin piece forms.
Step 2:
Use the sharp edge of a cuticle pusher to cut the cylindrical gel to size once you have decided where to place it on the nail.
Step 3:
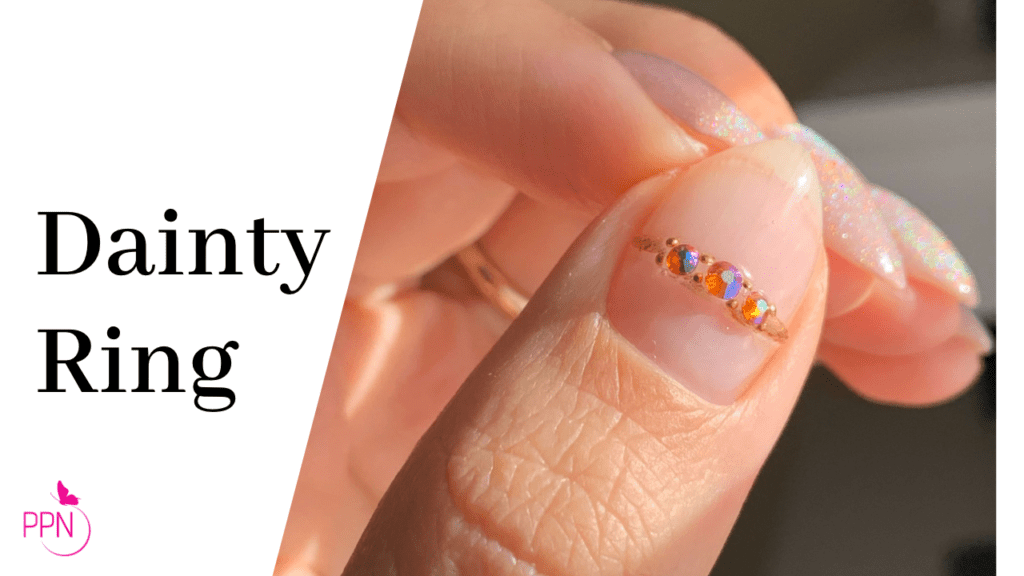
Choose the crystals you’d like to create the ring with, placing the largest in the center along the strip of 3D gel, with the smaller crystals to either side, leaving a tiny gap between each.
Step 4:
Fill each gap with the tiny caviar beads, pressing them into the 3D gel in each “corner” of a crystal, creating a dainty bejeweled piece of art on your nails. Only cure when you have arranged each piece exactly the way you want.
Step 5:
When satisfied with the final look, fully cure for 2 minutes in your lamp unit.
Step 6:
Now it’s time to play with the band, and adding a gold chrome is the perfect finishing touch to his ring design. Dust/tap off the excess on the chrome pen before pressing and rubbing the sponge applicator into the cured gel band.
Step 7:
Use a clean eyeshadow sponge applicator to scrub the chrome well into the band, creating a gilded effect.
Step 8:
Dampen a lint-free towelette and clean up either side of the ring, avoiding where you intentionally rubbed the chrome.
Step 9:
Cure again to help attract the chrome into the gel, letting it wear a little longer.
Double-seal the chrome into place; otherwise, it may peel away from the ring band. Cure your chosen base and/or top gel for 30-60 seconds each time.
Final Thoughts Tips & Tricks:
Always wear gloves when handling any gel products, since overexposure may lead to acrylate allergies that have impactful consequences. Roll your 3D art gel using gloves and wipe down anything you’ve touched, like bottles and tools, to avoid spreading the risk of touching uncured monomers.
If you do not have 3D gel, you can use a thick builder gel or other gem gels, but avoid base gels as these are not strong enough to hold embellishments, being that they are too flexible.
You can also use a non-wipe top gel to rub the chrome, creating a more pronounced effect.
Don’t forget to always double seal your chrome with either top coat or base and top coat at the final stage, this is essential in making sure it lasts.
Thanks for joining us today. How did you like today’s look? Let us know in the comments below.

Content written by Paola Ponce & Fabiola Saucedo
Loved this blog? Then I think you’ll love learning more about my journey as a specialized gel nail solopreneur in the nail industry. Click here to get instant access to my free masterclass. These blogs are copyrighted material, and any blog use is not permitted without written concern first. Some of these blogs contain affiliate links that give us a small commission when qualifying purchases are made. Thank you for being so supportive, which helps us to continue creating valuable resources and content like this.


