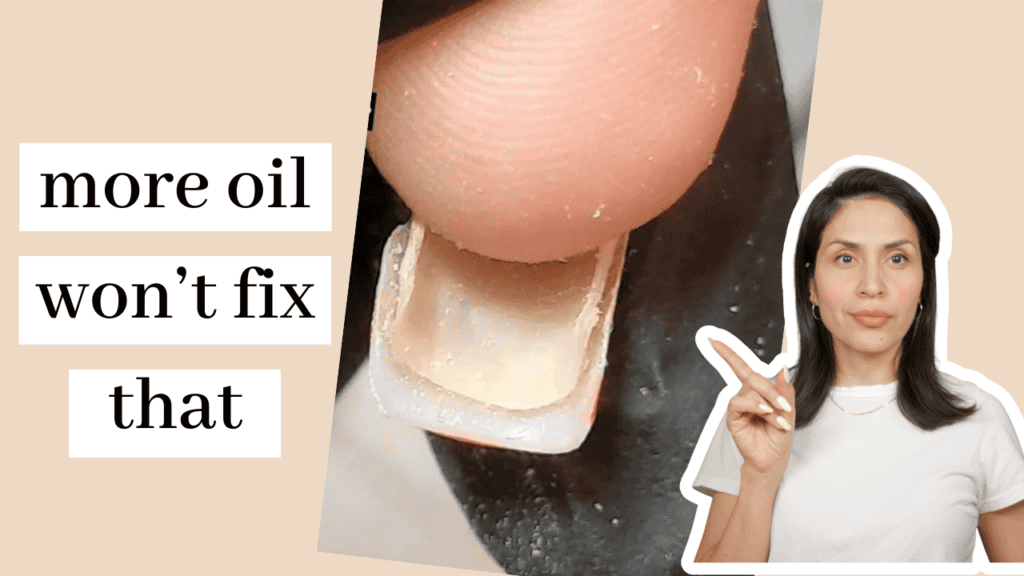
The only real reason why gel nails lift at the free edge… Nope it’s not because you did not oil them enough… It is because there is an incompatibility issue between the nail plate and the nail enhancement.
That’s the reason… now let’s find the culprits.
As always when it comes to mastering retention you have to understand a combination of different scenarios that can lead to lifting in different parts of the nail. This is why something may work for one person while the same thing may not work for another… because there are several and sundry culprits.
In this video I’m going to show you the various culprits that cause lifting at the free edge of your gel nails, and how to fix it.
When you’re ready hit “play”.
EDUCATION MENTIONED IN THIS VIDEO
🔺Master Gel Nails Book
https://paolaponcenails.com/mgnbook/
🔺Free Masterclass to help you as a structure gel specialist:
https://paolaponcenails.com/masterclass/
UPCOMING CERTIFICATIONS
🔺KOKOIST Certification
https://paolaponcenails.com/kokoist-waitlist/
🔺NAIL THOUGHTS Certification
https://paolaponcenails.com/nt-waitlist/
✨Sign up to our weekly newsletter here:
https://paolaponcenails.com/
PRODUCTS MENTIONED IN THIS VIDEO
🔺KOKOIST (Code PPN10, save 10%)
Shop at https://paolaponcenails.com/kokoist
-KOKOIST Infinity Lamp
🔺ULKA Lumos Curing Lamp (Code PPN10, save 10%)
https://foxnailsusa.com/collections/uv-lamps/products/ulka-lumos-led-lamp
🔺RÉDI Professional (Code PPN10, save 10%)
Shop at: https://paolaponcenails.com/redi
-Twin Seal cushion base gel
THE REAL REASON FOR LIFTING AT THE FREE EDGE
The only real reason why gel nails lift at the free edge… Nope it’s not because you did not oil them enough… It is because there is an incompatibility issue between the nail plate and the nail enhancement.
That’s the reason… now let’s find the culprits.
If you’ve come across pictures of nails that look like this and you’ve fallen for the claim that the lack of cuticle oil is to blame. It is not.
Don’t get me wrong. Cuticle oil does help gel manis last, but it’s not a miracle solution for retention.
But the real reason(s) why these nails look like this is because they have been overprepped during application. They’ve been rough down too thin, and have had dehydrating chemicals applied to them. And for those reasons, no amount of cuticle oil will thicken or re-hydrate them to rehab.
As always when it comes to mastering retention you have to understand a combination of different scenarios that can lead to lifting in different parts of the nail. This is why something may work for one person while the same thing may not work for another… because there are several and sundry culprits.
Let’s dive into the culprits that cause incompatibility between the nail plate and the product, so that you can better guess which culprit is causing your free edges to lift. A lot of these culprits come way before we start thinking about whether or not we’re using our cuticle oil daily–
Which you should.
After identifying the culprits, THEN, I’ll show you how to fix free-edge lifting once and for all.
Culprit # 1 Curing Unit
If you don’t cure the gel nails well from the start, forget it. You’ll have all the issues, including, lifting at the free-edge.
A low quality, low power or old curing unit will not harden and adhere the products properly to the nails. And no matter what you do from henceforth, if the gels aren’t curing properly nothing else will matter.
Uncured gel can end up being much more flexible and unstable than the natural nail, leading to lifting. And the most un-stable part of the nail is the free-edge.
If you need a good affordable curing unit recommendation… Check out KOKOIST’s Infinity gel lamp, or the new lamp by LUMOS by the high-end equipment brand Ulka. (Code PPN10, saves you 10%)
Culprit #2 Hand positioning
On the topic of curing, just about all of the curing units in the nail industry are LED bulb lamps. LED curing lamps are position specific for curing. This means, that every nail literally has to be under a bulb in order to properly cure. Train yourself and your clients to use the guide on the bottom plate of the unit to properly position their nails under a nail bulb. Most gel lamps have a guide, if yours doesn’t DIY some indicators.
Most importantly, ensure that the thumb is properly cured, either by positioning it up right, and curing it alone, or by ensuring that it’s not folded-in or away from being directly by a bulb.
And while we’re on this topic of properly curing, if you flash cure nails, make sure you ALWAYS fully cure. At least 30 seconds, and without wiggling around in the unit.
Culprit #3 Thin nails
Thin nails and hard products are the biggest incompatibility issue to be aware of. If the nail is too flexible, and the product is too hard, the natural nail will flex during every day wear and the product will not, which means that in day-to-day wear the natural nail is actually pulling away from the product. And again the area that moves the most is the free-edge as it no longer has support from the nail bed.
Peeling gel nails off of the natural nail will also lead to lifting, as the product then has very little keratin to hold on to.
So if you work on a client who just peeled their gels off, make sure that this next set is not going to wear the best, and they may have to come in sooner than the average duration of your gel nail service. Which is a pretty standard 3-4 weeks.
Culprit #4 Improper prep
Prep consists of adhesion agents and abrasives for improving adhesion.
I break this all down very thoroughly inside my Master Gel Nails Book. If you haven’t yet gotten your copy, make sure to grab it here. Prep, products, and technique are the fundamentals of understanding structured gel nails thoroughly, and I break it all down in the book. Including step-by-step application.
More bonder, and harsher etching may give you good retention in the beginning, but if you over due your prep, eventually clients’ nails will look like the nails we first started with.
The point here is to do only as much as you need to do, to achieve the longest wear consistently, especially on regular clients.
Since they’re coming in regularly, at least once per month, we don’t want to over due things each and every month we see them because that excess will add up fast.
Culprit #5 Gel is too hard
Harder does not equal stronger.
The reason why many people like myself cannot wear acrylic nails without experiencing lifting, is because my nails are too thin, which means they flex a lot, and acrylic is a non-flexible product.
Acrylic wearers more than other clients need to treat their nails like jewels not tools because they do not budge, every tug is possibly detaching the product from the nail plate.
I actually also don’t fare well with hard gel either. The very few times I’ve used it. Which has been primarily to demo or try something for you. In order for it to last, I must use a cushion layer between the natural nail and the product.
This is the best way to mitigate this incompatibility between thin flexible nails and hard products… by applying a base layer on the natural nails that is flexible, and then applying the harder products, like semi-hard and hard gel.
Again the free-edge is going to be the thinnest and most unstable part of the nail so we want to be strategic about product being properly applied or finished at the free-edge.
… Which brings me to the best solution for avoiding free-edge lifting with gel nail products, especially builder gel products.
Here it is…
After understanding all of these culprits, the BEST way to prevent free-edge lifting is by reducing and tucking the natural nail behind the product. The product is harder, thicker, and less flexible than natural nails. Let it lead in the daily war of wear and impact.
And here is something to note…
The harder the product, the more you’ll have to reduce the natural nail underneath.
Once you do, NOW you can focus on giving your nails all the TLC they deserve! Cuticle oil, massage… That’s all going to translate into beautiful and strong growth of your own natural nails.
I hope this was super clear let me know your thoughts in the comments section below, and don’t forget to also check the description box below for any upcoming education, or products that we have mentioned.
See you in the next one.

Paola Ponce is a licensed nail tech of 10+ years and a certified Japanese gel educator.
Learn more about her journey as a specialized gel nail artist and her gel nail application course inside her free masterclass here.
These blogs are copyrighted material, and any use of this blog is not permitted without written consent first. Some of these blogs contain affiliate links that give us a small commission when qualifying purchases are made. Thank you for your support, which helps us to continue creating valuable resources and content like this.