
Hey how are you!
Can you believe this is our 25th consecutive video! Some December challenges end today, but not ours, we are carrying on until January 1st, which means 7 more videos!
We want to celebrate this effort with you, and that is why I am hosting a free, LIVE, Q&A session this coming Wednesday! You will have the opportunity to bring all of your soft gel nail and entrepreneurship questions and get them answered LIVE in this free webinar. Everyone attending LIVE will receive a gift, and you’ll also have the opportunity to win free products!
I’ll also be sharing with you all of the classes we have planned out for the first 6 months of the year. Registration is required for this event, so take a moment to pause your reading and sign up HERE! There will not be a replay for this event, so make sure to put this event on your calendar, immediately after signing up!
Magnetic Gels have been all the hype this year, and frankly, since they hit the market, maybe like 5 to 7 years ago. By the way, cat eye gel is another name used to describe magnetic gels for their resemblance to their eye effects when applied to the nails. But it seems we are shifting away from this name as we do so much more with the gel now ten a simple cat-eye effect.
Now, I must say I was not at all interested and that was because they were all worn over dark or black colors, and … I don’t really like dark nails.
But then Korean gel nail brand F Gel premiered a beautiful soft collection of magnetic gels in 2020, and it seemed that from that point forward magnetic gels made a strong return and that for good.
According to Zillabeau.com a leading distributor of Korean Nail Products, “Within its first month of launch, F Gel sold a record-breaking 50,000 sets, a milestone for the K-Beauty industry.”
Can we say, p-o-p-u-l-a-r-!?
Alright, I think you’re ready to dive in. Let’s do it!
Before we begin, here are three tips for an improved magnetic gel application:
#1 Initially stir your magnetic gel to bring up the gel particles.
#2 Note that for a bolder magnetic effect, you’ll need to grab a generous amount of gel
#3 Work one nail at a time so that you do not activate the nails to the one you are working on. You will be working twice as hard.
#4 Understand magnets. They attract and repel, and they reset meaning, even though they were just attracting, they can start doing the opposite if you have them meet again or have them hover over the magnetic particles for an extended time.
#5 You can start over again and again. The only way to ruin this magnetic gel art is by curing it. At any point, if you want to start over simply swipe the magnetic gel, or grab a bit more.
Alright, now that you’ve passed your crash course, let’s move on to the fun part!
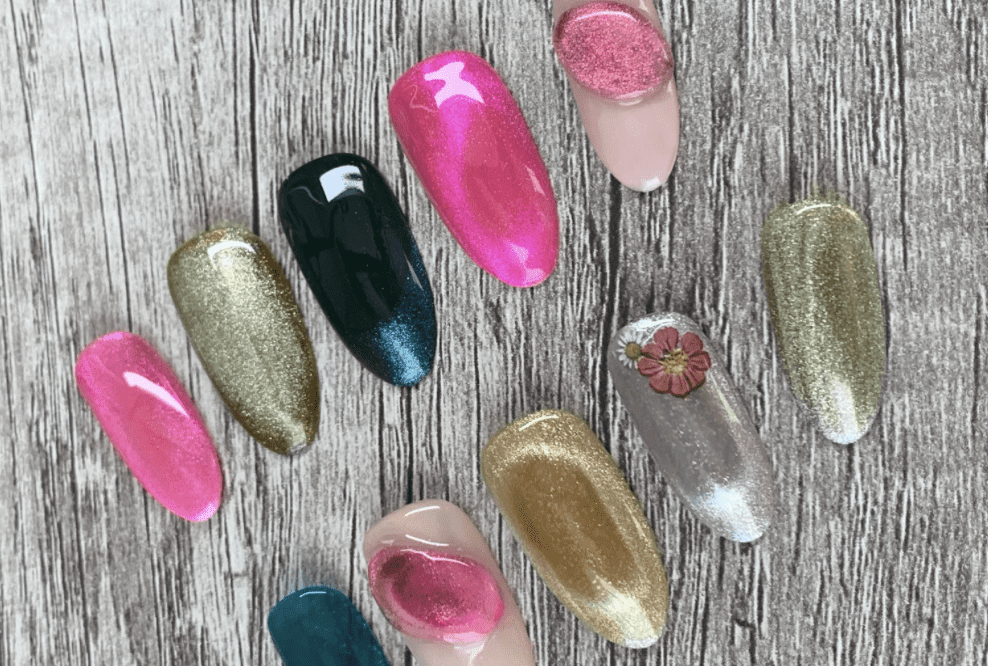
Here are the five looks we will be creating today:
- The Fully Activated
- The Framed
- The French
- The 3D
- The Layered
1. The Fully Activated
This look is the most popular and the one that will convert you to magnetic gels and keep coming back. It activates the magnetic particles on the entire surface of the nail, and as you sway your fingers back and forth, it plays a game of “now you see me, now you don’t.”
Here’s how you achieve it step-by-step:
1. Use a “jelly” color or translucent to achieve it. I am using Khaki Glass by Kokoist.
Paint one coat and cure, these glass colors by Kokoist are super pigmented, so you just need one coat.
2. Now grab your magnet gel. I am using U-3 Moldavite Stone from Kokoist. I want the magnet color to match the color underneath, and remember to apply magnet gel generously.
3. Use the magnet and place it on all four sides of the nail. This will push the magnetic glitter particles to the top and create the jewel-peek-a-boo effect. Easy right? You or your client will be looking at these nails all day long.
Tip: Use the magnet to go around all the edges of the nail to push the glitter to the center and expose a bit of the color underneath, this will create a border effect. Try it! I’ve seen a ton of accounts using this look.
#2 The Framed
This one is perhaps my favorite. I learned this from Kokoist Technician Hiyo! It’s my favorite because it is so simple yet so chic and elegant. I’m actually wearing it now.

Here’s how you achieve it step-by-step:
1. I’m using color 276 from Kokoist as the base color, it’s a neutral tone with gold flakes; for the magnet color Im using Saturn #02 from the Planet Magnet collection.
2. Now, very important. Use the circular side of the magnet (make sure it’s the circular side) and hover it at the center of the nail and lift it. If you move it to the side, you will move the sparkles to that side, so if you want the perfect circle, lift the magnet when you’re happy with the placement of the magnetic sparkles.
3. You can come back and push the particles more to the edge but don’t go crazy, don’t obsess with it, just find your placement, cure, and top coat it.
3. The French
This one is super slick. So you’ll want to activate the surface of your magnet, all of it. And then drag one magnet down the center to your desired French Tip shape
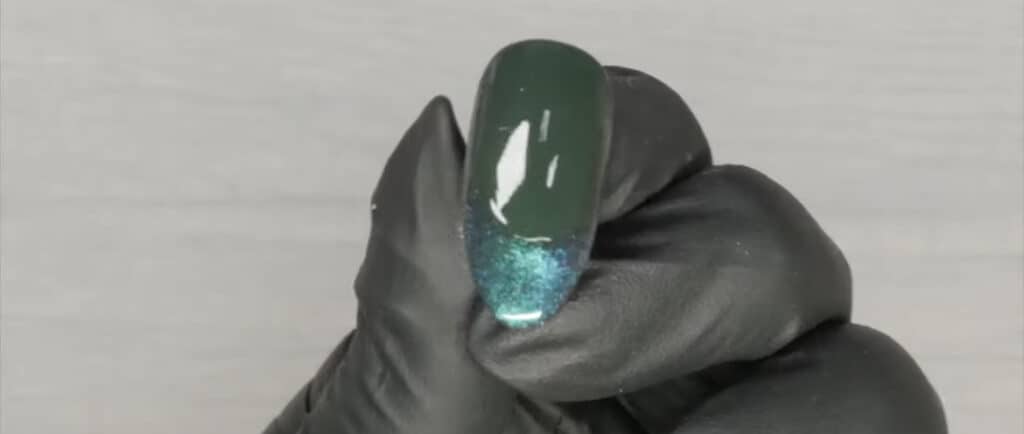
Here’s how you achieve it step-by-step:
This one is so beautiful! I mean, aren’t all, lol. The point here is to create a beautiful french line, I like mine deep, with high wings on the sides. I’ll show you a great tip for this look.
1. Im using the color 224 Midnight Forest (make sure you use a darkly pigmented color). It’s very pigmented, so you only need one coat and cure.
2. Now Im using the color DP-3 Turquoise and Many, the main color is turquoise but you can see many other colors. Apply a generous amount on the entire nail, don’t worry! These magnetic gels don’t bulk up and don’t cure yet!
3. Use the rectangular side of the magnet and from the top start hovering it pushing the particles to the free edge of the nail. You can use the circular side to make the french line more pronounced and take it to the lamp for a full cure.
Tip: Grab a round brush (make sure the bristles are flexible and bouncy) and pick a small amount of the dark color you used for the base; use it to frame and clean the french line. Make the smile line as deep as you want and cure. Gorgeous!
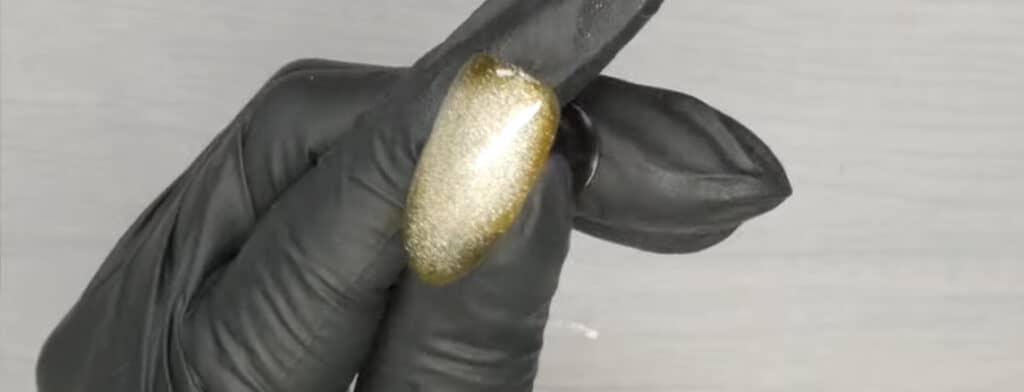
4. The 3D
Magnetic gel is not bound to only be applied as a color overlay, use it in or with your 3D Gel to create show-stopping accents.

Here’s how you achieve it step-by-step:
1. I’m going to use Boba gel and to make the 3D magnetic piece pop Im will use a milky nude #169 Cashmere Toffy.
2. I’m using the High texture Boba gel from Kokoist with a spatula and grabbing a small dollop. Use gloves always when dealing with uncured products and shape the boba gel to the shape you want and place it on the nail. Im rolling the gel and pressed it into the nail.
3. If it gets too sticky, add a little alcohol and continue working on it. You can also use tools to make indentations or shapes. Again, the magnetic gel can be used for more than just color overlay, like 3D pieces.
4. Without curing the Boba gel, grab a sheer color like this glass magenta and paint the 3D piece. Because the color is translucent both will cure under the light; I’ve could add the magnetic gel but I want more opacity so Im taking it for a cure.
5. Im using magenta and many colors in the Dragons eye collection from Kokoist too and painting the 3D piece. Grab your magnet and do whatever you want to create with this. A line, full coverage, frame it, etc., have fun! Once you’re happy with the design, cure, apply a top coat all over the nail, and send it for a full cure.
5. The Layered
Just like you’re not tied to only applying the magnetic gel as a color overlay, you’re also not tied to sticking to its original color.

Overlaying it with translucent colors has been equally as popular.
Here’s how you achieve it step-by-step:
1. Use the soft cashmere color and apply one coat, and cure. Use the magnetic gel of your choice, Im using Moon, a silver magnetic gel 01.
2. Paint a generous coat of the magnetic gel and use the magnet to bring all the sparkles to the middle and then hold the magnet in the middle at an angle to make the cat eye effect, the basic line in the middle cure again.
3. Use a sheer color like this magenta and overlay the magnetic gel design. Listen, if you want to just silver magnetic cat eye and overlay it with glass colors, you can create so many designs! Try it!
But the fun doesn’t end there; you can overlay anything on top of them. How about some decals or stamping nail art? All-soo-possible!
I want to add that this class was all done using Kokoist products, and that was not planned. It was so easy to find everything we need in one brand, so if you are shopping, this is great because you can find everything you need for magnetic gel galore at one shop. You can shop for Kokoist products HERE and use code PPN10 for a 10% discount on your purchase.
And there you have it, some tips to nail your magnetic gel nails, and some modern trendy art to help you keep things constantly Fresh! Which one of these was your favorite? Let me know in the comments section below!
____

Content written by Paola Ponce and Fabiola Saucedo
Loved this blog? Then I think you’ll love learning more about my journey as a specialized gel nail solopreneur in the nail industry. Click here to get instant access to my free masterclass. These blogs are copyrighted material, and any use of this blog is not permitted without written concern first. Some of these blogs contain affiliate links that give us a small commission when qualifying purchases are made. Thank you for being so supportive, which helps us to continue creating valuable resources and content like this.


